


7 simple tips for the everyday Excel user
The majority of us use Excel to some extent in our day to day working life. Unless you are an analyst or your job role requires you to use this diverse tool to the extreme, most of us barely touch even 20% of the functionality that Excel offers. Well that’s fine because we probably don’t need to be aware of the other 80% used by the power users.
However, within the 20% there are lots of simple short cuts you may not be aware of. So, we’ve decided to bring together our favourite functionality that we find useful for the everyday use of Excel.
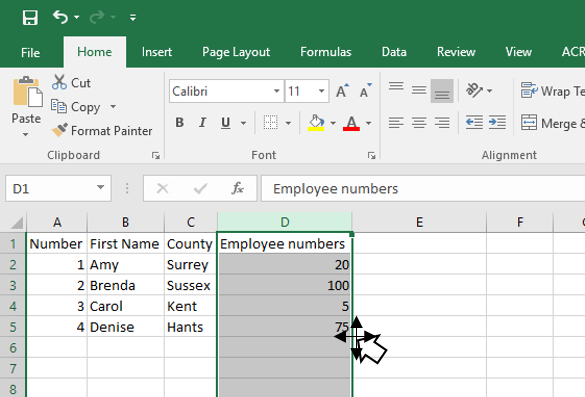
1. Quickly copy data to the next column
You might want to copy data from one column to the next. Instead of using the copy and past function, highlight the row you want to copy, hover over the edge until the cross with four arrows appears, then click on the Ctrl button and drag to the right. A new column will appear with the data copied over.
2. Move quickly around a spreadsheet using Ctrl
This is a speedy short cut that replaces taking forever to scroll down to the bottom of a spreadsheet.
Use Ctrl button on your keyboard and the downward button and you’re there in a blink. It works going across and upwards on the spreadsheet too. Just press Ctrl and the arrow that relates to the direction you want to end up in.
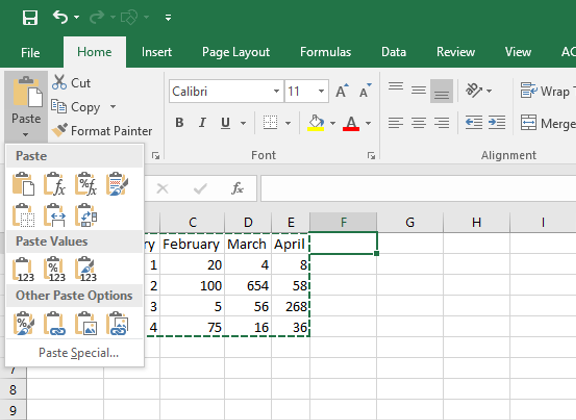
3. Change data from a row to a column
Have you started working on a spreadsheet and realised that it would make much more sense if the rows were columns instead? If so, this is one for you.
Highlight the data that you want to transpose and copy. Move your curser to a blank cell where you would like your new data to appear. On the tool bar click on the downward arrow under paste (or right click), hover over the small icons until you see Transpose, then click. Your data has now transposed, making it much easier to read.
4. Change capitals to sentence case
In Word, you may have changed a title that was in capitals to Sentence case. It’s a function that’s quite easy to find on the Word tool bar. You may want to do the same in Excel, but this function is not quite so easy to find.
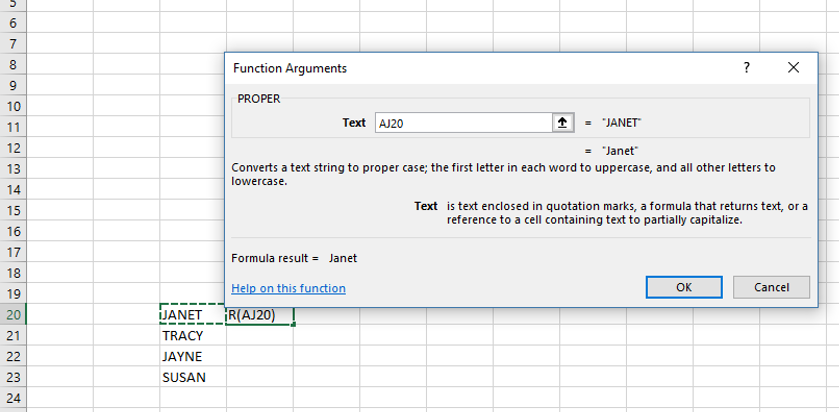
Click on the cell next to the one you want to change from capitals to Sentence Case. Go to the Formulas tab and click on the dropdown arrow under ‘Text’ (it has an A icon). Choose PROPER (this is Sentence case) then in the Text box click on the cell that has the word you want to change. Then click on OK. With the new cell highlighted you can use the bottom right hand corner of the cell to drag the cells down so that they all follow the same format.
Bonus quick tip! If you double click on the bottom right hand corner of the cell it will automatically fill all the cells underneath.
5. Speed up adding titles or long names
If there are words or terms that you use repeatedly for titles you can speed up the process by using the auto correct function. For example, we can set a rule in auto correction that every time we type TLP, TLP Technology will appear, saving us having to repeatedly type Technology.
To set this up go to File > Options > Proofing > Auto Correct Options >
In the box marked Replace type TLP (or your abbreviation) in the box marked With type TLP Technology (or rather your full word).
This works in Word too!
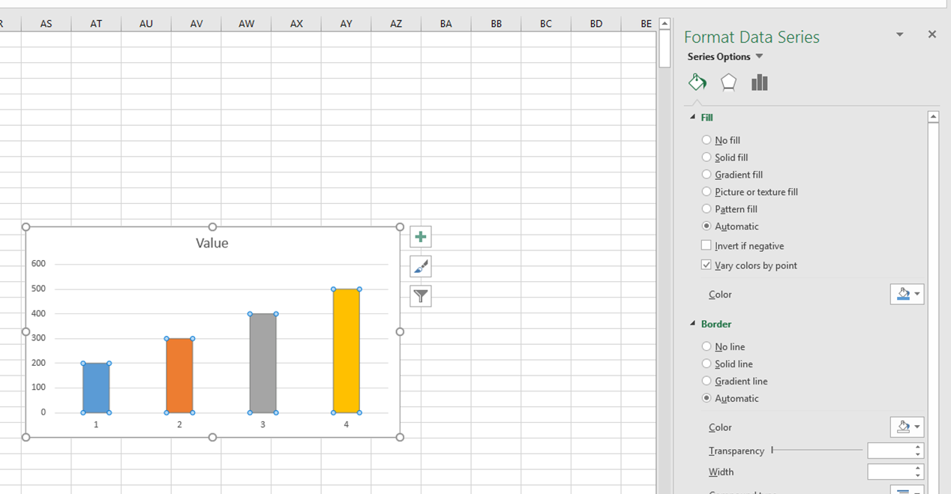
6. Jazz up your charts
A report is so much more inspiring when a bit of colour has been added. Here’s how you can jazz up your charts.
Once you’ve created your chart, click one of the horizontal bars, right click and choose Format Data Point. From the box that appears on the right choose the paint bucket, which then gives you all sorts of ways to make your bars stand out. Here, we’ve chosen to ‘Vary colours by point’. Alternatively, you can choose to colour the bars by gradient, patterns or even a picture that’s on your clip board. Have a go at bringing your reports to life with a bit of variety.
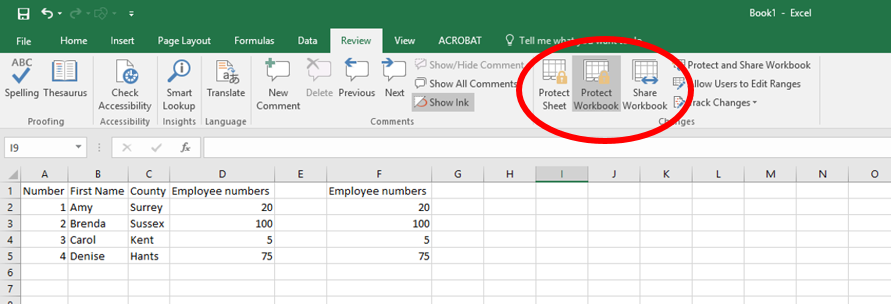
7. Workbook and Worksheet protection
Our list wouldn’t be complete without a tip about protecting your spreadsheets.
For added security you can add a password to your spreadsheet. This can be done by going to the Review tab then Changes and then clicking the Protect Workbook icon. You can then add a password.
You may, however, want others to work on your Workbook but need to lock/protect cells or worksheets within it. In which case, choose Protect Sheet and then which elements of the worksheet you wish to protect from being changed.


